Storage of materials for batch (Hot) composting
Traditioinal Hot Composting Systems involve batch composting where the objective is to have a sufficient volume and mix of waste available to enable the compost bin to be filled on the same day. This page covers these systems. the techniques for using modern hot composting bins, such as the Hotbin, where material is added twice a week are not covered here.
In the UK and other temperate climates there may be a constant supply of kitchen waste throughout the year (although the target should be to Love Food and Hate Waste by keeping cooked food waste to a minimum) and this will compensate for the lack of fresh garden waste during the winter months. During the summer there may be a glut of garden waste when the batch composting bins are fully occupied by material already being composted.
This brings us to one of the aspects of hot composting that is often only mentioned in passing. The need to store organic material ready for composting until the bin is available or sufficient material is at hand to fill the compost bin. It is not just a question of having storage space, in the form of separate compost bins or dustbins but a suitable system for each type of materials to be stored.
Storage of Browns for hot composting
The holding bin(s) are best located near to the composting area.
Some materials such as shredded paper and cardboard are easily stored in sealed dustbins, and provided they are kept dry, the material will not decompose during the storage period. Similarly, woodchip used as a bulking agent if kept dry does not create any problems although I prefer storage in a dustbin rather than a covered pile.
Straw can be left in bales or bags and covered. It can be chopped immediately before use to speed the composting process.
Autumn leaves can be stored in wire netting cages or if dry in polythene or burlap sacks. In the UK it is often recommended that Auturm leaves are best used to make leafmould rather than as a Brown in the compost bin as they take a long time to decompose. In the US leaves are frequently and effectively used as a Brown without any problem and we have tried them on our composting demonstration site.
The storage bins should be suitable for the intented contents for some items such as leaves could be stored in a simple circular or square wire netting bin. Autumn leaves stored in such containers can to be added to the hot composting bin during the late autumn and winter.
Shredded woody prunings, brassica and similar stalks can also be stored in an empty commercially available plastic or wooden compost bin and homeade bin made from pallets scrap timber or even old doors. Some recommend using a compost pit and keeping them slightly damp allowing moisture to penetrate the material to make it easier to compost. This offers advantages when using a batch composting with a set of New Zealand or pallet bins where material can be easily added using a garden fork. Personally, I prefer to keep them dry making handling easier when transferring to commercial composting bins especially when using a horizontal tumbler or bin with a top lid. The stalks will need chopping or shredding before being added to the hot bin and if being stored in a moist pit it is probably best to chop them before they Are mixed with other waste.
Whether stored damp or dry cardboard, paper, woody materials and other materials will be soaked when added in layers to construct a hot compost heap or pile. heap
Vegetable, herbaceous, bedding plants & flowers
One of the simplest storage method for green garden waste is to use two bins or covered piles. One pile is for coarse materials such as stalks, finished annuals and pot plots and prunings. The second bin is used to collect grass clippings and green leaves.
Green vegetable tops, material such as annual weeds and green manures are best exposed to the sun to dry for a few days to reduce their moisture content before storage. Although the heat generated during hot composting should kill perennial weeds I would suggest that such weeds are completely dried before being added to the storage bin.
Water plants removed when clearing ponds can also be sun dried before storage if they are not to be immediately added to the compost bin. Once dried this green waste can then be stored in a covered pile or New Zealand bin until required
Grass clippings
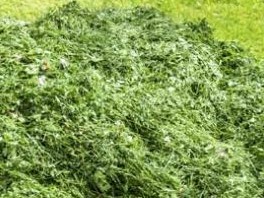
Freshly cut grass is high in nitrogen i.e. is a ‘green’ material and if stored directly in a bin may decompose quickly forming a dark, wet, smelly anaerobic mat. This can be avoided allowing the grass clippings to dry out completely before adding them to a storage bin. The dried grass will be classified as a “brown”.
I have found one report that suggested that it is possible to reduce the likelihood of fresh grass clippings being stored in a bin becoming anaerobic by turning it every other day using a fork or aerating tool creating “buoyant airflow” (I have not tried this). When I cannot dry the grass mowings I prefer to mix them with a bulking agent such as dry wood chip or autumn leaves until they can be added to the hot composting bin.
Hot Composting
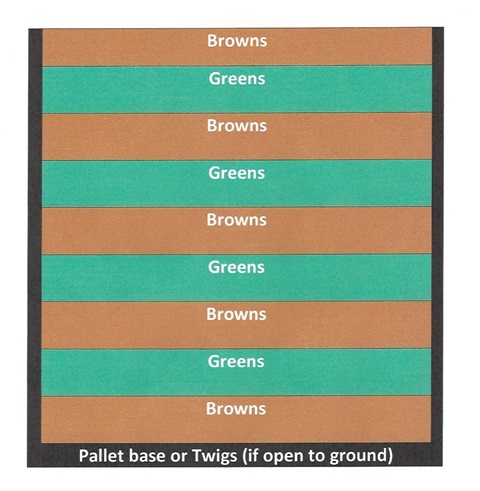
Greens and Browns layered in a bin before turning.
Alternating in this way helps give the right ratio of Greens & Browns
Most people use a cold, or passive composting system when they first start composting as it is simpler and requires less effort as material from the kitchen and garden is added to the bin as and when it becomes available. The disadvantage of this technique is that it is slow (taking 6 –18 months) and does not kill seeds or pathogens.
Hot composting involves more work than cold composting but will produce compost in a much shorter time (25- 90 days) it kills seeds, perennial weeds and pathogens. I personally feel that is more rewarding as the efforts of the composter contribute to the quality of the finished product. alternating layers of high-carbon (brown materials, such as dead leaves) and high-nitrogen material (green materials, such as grass clippings) or mix the two together and then heap into a pile. If alternating layers, it is suggested that each layer 5 to 10 cm is made thick. Althought there are many other layering combinations and we show a number on this site. Layering is a simple way of getting the desired ratio of greens and brown
Some composters find that mixing the two together in advance is more effective than layering and the National Trust, at some sites, use a machine to grind and mince the green and brown waste using a ratio of 40% of greens and 60% of browns.
Use approximately equal amounts of each. If you are low on high-nitrogen material, you can add a small amount of commercial fertilizer containing nitrogen. Apply at a rate 125 ml of fertilizer for each 25 cm layer of material. Adding a few shovels of soil will also help get the pile off to a good start; soil adds commonly found decomposing organisms.
The four phases in the hot composting process are:
- The first mesophilic phase during which the temperature rises to 40-42 °C. This stage may last for only a few hours or a couple of days depending on the bin and contents;
- a thermophilic phase lasting for two or three days but can last for to three or four weeks or several months depending on ther size of the heap. During this stage the temperature rises from 45-65 °C. It can rise to 75 °C but should be controlled so that it does not exceed 65°C
- a second mesophilic phase occurs as the material cools allowing mesophilic organisms to recolonize the bin and
- the final phase is that of maturation (or curing) which can last for several weeks to several months.
The objective in managing the temperature of the material is to prolong the thermophilic stage so that the heat kills pathogens and seeds but without the temperature rising above 65/70 C when beneficial microorganisms will be killed. A good visual warning that the bin is to hot is provided by the growth of a white “mould”, actually anaerobic thermophilic bacteria. Which means that the appears of the white growth acts as a warning to cool the bin. This “mould” will disappear when the temperature drops
While a “cold composting system may benefit from a sunny location the hot composting area should, if possible, located so that it does not get dried out too much sun or waterlogged heavy rain.
Hot composting bins need to be at least one cubic metres in size but can be much bigger depending on the size of the garden or grounds providing the feedstock. When hot compost it will be necessary to have easy access to the bin to turn the material so a one cubic metre bin will require at least 1.5 x 1.5 metres of space. The area should be well-drained and level. The bins can be made out of old pallets, planks,decking or in the case of large bins railway sleepers or cement blocks. The soils within the bin can be covered with a 6-8" layer of twigs, sticks or stalks to assist in creating airflow through the contents. A layer of woodchip can also be used as an alternative base material this makes emptying the bin easier than shovelling sticks.
However, that is the minumum recommended size. Larger bins will retain the heat much more effectively and, depending on the size of the garden the bins in large gardens are often about 5cu feet on size as above this size it is more difficult for air to circulate within the bin. But bins of seven or eight cublic feet are often used. Bins larger than this be difficult to turn by hand and a tractor or other mechanical means will be required.
Most Hot composting systems involve adding the organic material in a “Batch” to fill or half fill the bin at the same time. Normally a bank of 3 or 4 bins are used so that the material can be aerated by turning from one bin to the next.
In the basic hot composting system, the bin is filled with equal parts of Green and Brown materials. These need to be cut, chopped or shredded into small pieces ideally 1- 2”. Decomposition takes place on the surface of organic material if it is chopped, smashed, -or cutt into small particles, (less than 2-inches in diameter), more surface area is created and decomposition happens faster. Depending on the technique manure, mature compost or soil may be added as a source of additional microorganisms or lime may be added to control acidity. Layers of addition Greens such as comfrey or nettles may be used as an activator. Water should be added as the pile is built, often between each layer. To breakdown quickly a moisture content of 50% will be required
The heap should be covered both to maintain moisture, and to prevent the material becoming waterlog during wet weather.
When starting to use a new bin or a significant change of feedstock the temperature should be monitored regularly taking the pile temperature every day or every other day if possible, for a period of about a month. The temperature should rise to 40 -76 C in the first one or five days. The actual temperature will vary with the bin size, moisture levels and microbial activity.
The contents of the bin should be aerated by turning whenever the temperature falls below 40C which is normally about every four of seven days. Some composters turn the bin routinely every couple of days or weekly while others record the temperature and turn the contents when the temperature falls. After a slight delay the temperature will rise again.
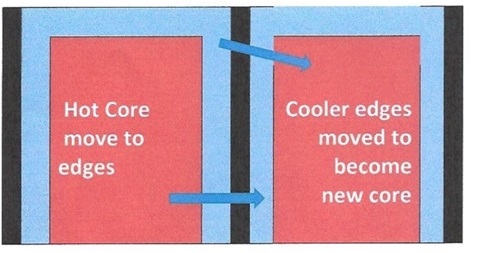
The recommended turning technique is to turn the material round the edges of the bin to make the central core of the new bin and while what was the hotter central core to form the new exterior of the new pile ( see diagram). This ensures that the cooler edges of the bin during the first week is heated in the hotter central core during the second week.
The moisture level of the contents should be adjusted each week during the turning stage,with water being added to maintain the correct moisture levels being careful that it does not become waterlogged as this will both cool the contents and may result in the formation of undesirable anaerobic patches.,
I recommend the monitoring, recording temperatures and turning is continued for a month by which time the temperature will fallen to below 30C (depending on ambient temperatures) and most of the material will have turned into dark, crumbly compost
The compost should be left to mature for at least two weeks before use as a mulch
Kitchen waste: Fruit and soft vegetables for hot composting
Kitchen food waste at home is usually collected in a 5 litre kitchen caddy with an airtight lid. The caddy can be emptied into a larger food waste container (such as used by councils for kerbside collections). It is best to put sheets of folded newspaper in the bottom to absorb some of the liquid and to make it easier to empty. It is said a little compost placed on top of the waste will reduce odours. Newspaper can be used to cover the material and discourage flies.
Small quantities of fruit and vegetable can be stored in a refrigerator or deep but on an allotment or when larger scale composting is being undertaken this is not practicable. Stored in the garden, fruit and vegetables will start to decompose although the rate of decomposition will vary. The decomposition of the more putrescible fruit need to be kept to a minimum to reduce the risk of fly infestation and so that most of the decomposition can be restricted to the compost bin so that most can take place in the actual compost heap.
Traditional Hot composting methods are given Compost heaps
Plastic compost bins, preferably with a base and lid covered compost bin can be used although I prefer a wooden New Zealand bin with a removable front to make the removal of the stored material easy, but such bins may be more difficult to protect from rain and will not be as effective in preventing fly access. If a plastic bin is to be used one with a tightly fitted lid is recommend. Restricting the access of air will reduce the rate of decomposition during storage as will keeping the bin as cool as possible by choosing a shady location.
The Berkeley Method of hot composting
Turning the contents during hot composting. this is repeated every second day, weekly or when the core temperature cools
Quicker hot composting can be achieved by using the Berkeley method, developed by the University of California, which takes only 18 days to produce compost using a system involving turning the heap every couple of days. This works best with a four-bin system although it can operate turning the compost between two bins.
A 1.5 metre high x 1 metre square compost bin is filled with alternate layers of green and browns adding a layer of comfrey, nettles or old compost to the middle of the heap as it is built. The contents are gently soaked the contents until water drips out of the bottom of the pile.
On the firth day turn the heap is turned on the 5th day. so that the outside forms a central core in the new pile and what was the central core of the original pile forms the outer layers of the new pile. It is then turned using the above technique every second day. By the 17th day the process should be coming to a close and by day 18 the compost should be ready to move to a maturation bin. The peak core temperature or 55-65C will occur between days 7 and 9.
If the compost does not heat up adequately a handful of blood and bone fertilizer can be added when turning the material. If the green brown balance contains too much nitrogen the compost will starts to overheat (and smell) and/or reduces in size add additional browns such as sawdust or woodchip when turning.
This method will release a small amount of methane into the atmosphere ( Climate change)
In some hot composting methods, the material is not turned with reliance being placed on the use of level layers to achieve a mix of the Greens and Browns.
Hot Composting with mixed Greens & Browns
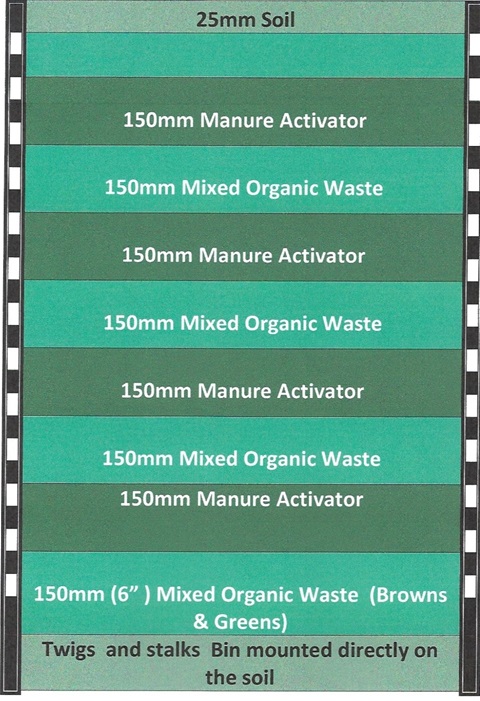
Pre-mixed greens and browns with manure as an activator
Most hot composting methods start with the Greens and Browns being layered in the bin separately providing a visual means of ensuring the correct Green Brown ratio. However, it is not strictly necessary to start the Grrens and Browns in separate layers to achieve hot composting as they will be mixed regularly when turned to aerate the material. If necessary, mix can be adjusted at this stage.
There are alternatives to layering the Greens and Browns which involve premixing the Greens and Browns. The technique was developed using a compost pile but has been modified here for use in a bank of compost bins. As with most of the hot composting methods the bin (or pile) should be at least 1 cubic meter in size and no more than 1.5 cubic meters in height
This simple hot composting technique using fresh waste does not require layering of the material, but it does need equal parts Green and Brown materials cut, mowed or shredded into small pieces to expose maximum surface area. To provide enough material for batch composting weeds and plants are saved and allowed them start decomposing and combining in a hot compost heap with relatively fresh material taken from a "cold" compost bin .. During the collection period the Green and Brown should be kept separately. Additional Greens are added to the mix in the form of freshly shredded comfrey leaves, nettles or grass clippings to fill the usual cubic metre bin. A shovelful of mature compost, soil or manure can be added while mixing the to provide a ready source of micro-organisms Water should be sprinkled onto the heap as it is built using a watering can moistening all mixed organic materials to the consistency of a wrung-out sponge. (wear gloves if handling compost which includes manure)
While it is not necessary to completely fill the bin in one day it is best if the bin is not started until an enough compostable waste has been collected. The heap is then covered with a tarpaulin, a thick plastic sheet or a compost duvet to keep out rain and to provide some insulation
Once mixed in the bin the material is best left for the usual four days after mixing and then turned either back into a pile or into a second bin. As with other systems the heap is turned every two or three days .for at least three weeks. The temperature should be monitored, and the core should be in the 4 5- 70 C range during the early stages falling off during the third week. When the temperature drops below 43 or 40C the material should by turning using the standard way of mixing. After three or four weeks, the temperature will fall to 22-29C and will not heat up following turning the compost should be left to mature for at least a month either in a covered heap or maturation bin.
Curing Compost
When the compost no longer heats up when turned it is ready to be "cured" or matured.This process usuaually takes 8-12 weeks it will take at least this long for the compost to be completely finished and ready to use. Some composters to be on the safe side leave it to over winter ready for the start of the new growing season.
Maturation can take place in the final bin in a bank of three or four bins, in separate plastic bins or in a covered heap or pile.
It is recommended that the maturing compost be checked during the maturation process and if it shows signs of drying out sprayed with water. The maturing compost should also be turned to aerate it. If using one of a line of bins this can be done by turning it into one of the empty bins, if it is maturing in a plastic bin it can be emptied onto a plastic sheet and turned back into the bin while if matured in a pile it can be turned using a fork. Turn every two weeks is suggested.
During this maturation process there will be some shrinkage, and pH will settle at or neat to neutral (pH7)
The finished Compost should be dark brown in colou , have pleasant earthy smell and crumble when handled.
Most books state that at the end of the composting process the original organic materials should not be recognizable. Howeverwhether this will be the case depends on what went into the bin. Corncobs, egg shells, teabags ( Composting Tea Bags) or woody material may not decompose. . These materials can be removed by passing the compost through a seive or screen with the objects that are held back being added to a new compost pile.
Testing that composting is finished
A simple test as to whether composting process is finished is to put a scoop or handful of the compost ain a plastic" freezer" or food bag and seal it for 3 days at room temperature.
If when opened it open the bag and smell the contents. If the smell is pleasant and earthy composting was complete.
If it smells unpleasant allow the maturation to continue and test again after a week or so.
Soilfixer Super Compost bin
This is a case of something a little different to produce compost or Biochar Super Compost in 90 days without turning or layering of the waste. (https://www.soilfixer.co.uk/garden-products/SoilFixer-SF60) .
The linsulated unit and aeration system facilitates hot and rapid composting without odour. The whole front can be removed for ease of harvesting the finished product. The larger model has a 1000l capacity while the smaller 200l model will take the place of 4-6 dalek type compost bins. We do not have this bin on our Demonstration site.
-
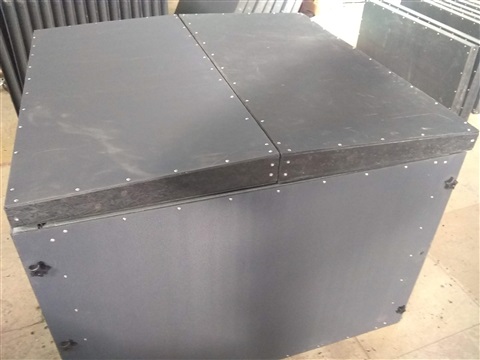
Soilfixer SF60 Super Compost bin
-
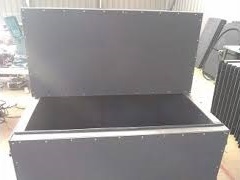
Bin showing easy access lid
-
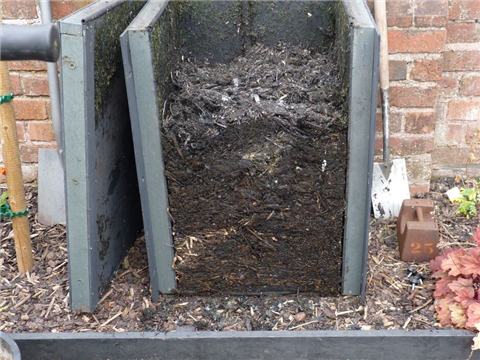
Front removed to harvest compost
Latest comments
Do you have any data on ' application ' of Aerated Vermi Compost Tea to Mangoes and benneficial outcomes .
Very informative site. Having been away for 5 weeks and returning to evidence of rats under and around the compost bin, I can testify to lack of human activity allowing the rats to get comfortable.
can i use dog manure in compost and mulching leaves?
What is the C and N ratio for coffee chaff?