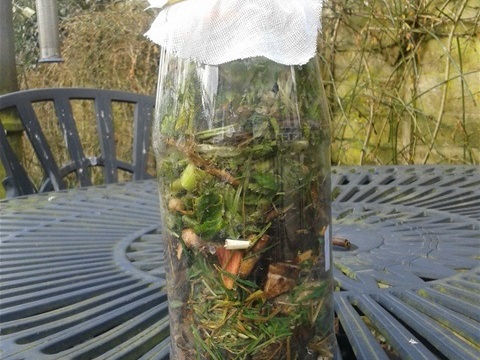
A Compost "Bin" in a Bottle
Rotbots allow children to watch and photograph the composting process over several weeks and then observe and record the growth of a plant in the compost they have created.
The effect of Worms
Adding worms to a Rotbot can provide additional interest and will enable students to observe their contribution to the composting process. If worms are to be used two Rotbots should be prepared using the same mix of materials with worms being added to the second bottle only. I do not recommend adding worms to the Rotbot unless it is certain that they will be harvested safely at the end of the procedure and not left to die in a neglected bottle.
In schools Rotbots can be made by students working in twos or in small groups.
Equipment required
1 or 2 two litre plastic ‘pop’ bottles, Scissors, (Optional Junior hacksaw), wooden stirring stick, garden fleece, mesh/muslin, rubber band, label and pen, tablespoon, saucer.
Using fleece to cover the top of the bottle allows additional material to be added as the level sinks during the composting process. There is an alternative method of covering top. When cutting the bottle leave a 1/2-inch hinge of uncut plastic. Once the organic material has been added the bottle top can be taped back into place. The composting material will sink down the bottle during decomposition. The tape can be removed, and the bottle top tipped to the side to add more material or it can be left to sink.
Ingredients
As with all composting a mixture of "greens" (nitrogen rich) and "browns" (source of carbon) are required for the composting process to work effectively. where young children are making the Rotbot it is recommended that only "clean" vegetable material is used. Try to get a range of colours to make the photos more interesting.
Browns
Straw or twigs, small pieces of paper or cardboard. (We find that shredded computer paper is easy to add to the bottle) and makes an interesting contrast in colour within the bottle.
Greens
Grass, vegetable leaves, potato and apple peelings, chopped up banana skins. Comfrey leaves are very good but can feel prickly, so gloves should be worn. It is good to have a mix of colours at the start of the process so that the layers can be clearly seen in the bottle.
Activators
One or two layers of compost taken from an active compost bin may also be added.
Growing the Seed
A layer of soil will be need at the time the seed is to be planted.
1 or 2 Dwarf Bean or marigold seeds (I recommend beans as they should provide some pods to be harvested, cooked and eaten.
Worms
5-10 composting worms if these are to be added
Procedure
- Rinse the bottles and remove labels. (Take a photo at this stage)
- Adult Cut the top off the bottle(s) using scissors or a sharp knife. (If using scissors, you may find it helpful to make a small starter cut using a junior hacksaw. Once the top has been removed trim the cut to remove any sharp pieces of plastic. Some people cover the cut edge with tape as an additional safety precaution.
- Adult Drill one or more drainage holes in the bottom of the bottle(s). If a large number of Rotbots are being made I put the bottles up-side down over a short length of plastic down drain pipe on a wooden frame. When the drill goes through the plastic base it is contained inside the pipe reducing the risk of drilling my hand or leg.
- Prepare the ingredients by tearing or cutting the organic materials (straw, twigs, leaves, grass, soil, vegetable and fruit scraps) into small pieces. The material can be moistened by the addition of water at this stage or if the Rotbots are to be moved later water can be added once they are in their final position. If water is added at this stage the mixture should be damp but not soaking wet. The correct moisture level will result in the materials having a water content like that of a wrung-out sponge.
- Build up the layers in the Rotbot by putting in straw and twigs first, then the fresh compost (or soil), followed by alternate layers of grass, shredded paper, vegetable food scraps and leaves. If the Rotbot is to be kept indoors choose plants with leaves that will not produce an unpleasant smell while composting. Herbs are good, cabbage and similar leaves might be best avoided.
- Fill to within an inch of the top. The contents may be mixed together with the wooden stick, but I prefer to keep the distinct separate layers of browns and greens as this looks better in the initial photographs.
- Add three to six tablespoons of water if the materials were not moistened earlier. If the Rotbots are to be taken home, it is best to leave adding the water until they are at home and standing in a saucer.
- Cover the Rotbot with garden fleece, mesh or muslin and secure with an elastic band.
- Stand the Rotbot in the saucer.
- If using two bottles to see what effect added worms will have add them to one of the two bottles once decomposing has started.
- Place in a warm place but not in the direct sunlight (Worms darkness so any worm Rotbots should be covered.
- Take weekly photographs to record the changes in the bottle and the rate at which the different Rotbots made by the class decompose.
- As the composting process takes place the material may sink in the bottle. Top up with additional material so that when the final layer of soil is added, and the seed is planted will be near the top of the bottle
- Add more water it if it starts to dry out
The compost Rotbot is ready for sowing after four to six weeks when the compost when the ingredients look like dark, rich soil. If level of the compost is only halfway down the bottle the bottle can be cut down to just above the level of the compost.
- At this stage a layer of soil should be added
Growing the Seed
- Plant a dwarf French bean or marigold seed in the layer of soil on top of the compost.
- Place the Rotbot in a well-lit place and water regularly.
- If a bean seed has been sown, you should be able to harvest a few pods to cook and eat
-
-

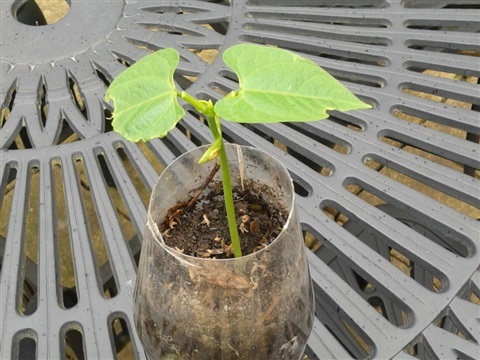
Seedling growing in a Rotbot
-

Greens: Comfrey
-
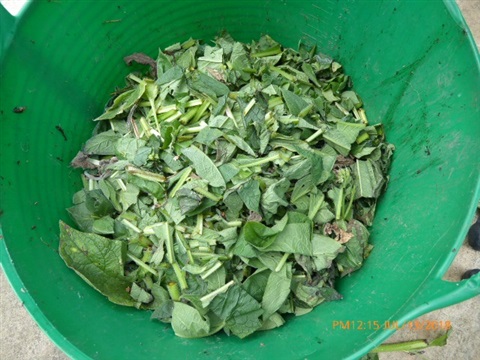
Comfrey cut ready for use
Rotbot and C:N ratio
Decomposition rates using different ratios of Green and Browns.
Carbon and nitrogen are the most important of the many elements required for microbial decomposition of organic matter to produce compost. The C: N ratio (Carbon: Nitrogen Ratio) is often referred to in composting books and websites, although less emphasis is placed on calculating the precise ratio of a mix than was once the case. Home composters are now advised to use equal amount of Greens and Browns rather than a calculated mix to provide an “ideal” C:N ratio of 25-30:1.
Actinomycetes, aerobic bacteria and fungi, are the micro-organisms responsible for most of the decomposition during composting. The most important of these are the aerobic bacteria which use carbon as an energy source and nitrogen to make the protein necessary for growth and reproduction. They obtain energy by oxidizing organic material, especially the carbon fraction. This oxidation process heats the composting material. If proper conditions are present, the material will show a rise in temperature within two or three days.
In this project, we are using Rotbots, to show how the ratio of Greens (nitrogen rich) and Browns (carbon rich) affect the microbial activity in, and the rate of decomposition of, the organic material. In addition we will be using different containers and recording the temperature using a soil or compost thermometer to see if the ratio affects the heatint produced. This exercise was developed from a Science Project: Compost Ingredients available at:
www.education.com/science-fair/article/what-makes-best-compost-pile/
The original projected used plastic bags to contain the composting material but 2l plastic bottles (as used to make Rotbots) are used in our first version as an alternative container. Later we will use larger plastic bottles to increase the volume of material and finally plastic bags.
Equipment and Materials (per group)
- 5 x2 litre plastic bottles with the top cut off (save the top to seal the bottle if fleece is not available). A drainage hole should be drilled in the bottom.
- Fleece to cover the Rotbot or the saved top that ca be inverted to use as a cover and retainer for the straw.,
- 5 “smoothie” drinking straws (paper is more environmentally friendly than plastic) pushed into the centre of the material. This avoids compressing the material by inserting a thermometer into it.
- Digital soil or compost thermometer that will fit inside the straw
- Greens and Browns to compost (Each group should use a different Green material.
- Compost (1 table spoonful per bag) as an activator
- Scissors to cut the compostable material into small pieces
- Marker pen or self-adhesive labels to label the bags or bottles
- Measuring jug
- 5 plastic containers to catch the waste liquid
- Measuring cylinder or jug
- Water
- Tape to hold the straw in place and seal the bags or to fix the bottle top in place
When choosing the materials to use in this exercise it is suggested that, if this is forming part of a class experiment, Greens and Browns with a range of C:N ratios are used by each group to see if materials with different C:N ratios will react differently.
Greens
| Comfrey | Vegetable waste | Grass Clippings | Vegetable peelings | Fresh weeds | Mixed Fruit Waste |
| 9.8 | 11 | 17: | 18 | 20: | 32 |
Browns
| Straw/Hay | Paper towel | Office paper | Newspaper |
Cardboard (corrugated) | Sawdust (fresh) |
| 87 |
110: | 129 | 170: | 563 | 550 |
In the table above the midpoint has been used where a range is given in the carryoncomposting.com C: N table
The organic materials both the Green and Browns should be cut into small pieces preferably 1”-1. In theory the smaller the organic material the quicker it will compost as a larger surface area is exposed to the microbes. As most home composting is based on volume rather than weight of material i.e. a 5-litre caddy full of waste rather than the weight of waste the caddy it is recommend that the materials used are measured by volume rather than weighed. The volume of the I suggest adding the Greens and Browns separately to the bottle and measuring by eye and then removing the contents and mixing them.
Students should have the choice of different Green material e.g. lettuce, other salad leaves, grass, comfrey, banana skin.
Each group should set up 5 bottles using different quantities of the Green material (A: 100%, B:75%, C:50g, D:25% E: 0%). The same type Brown material should be added to bring material up to the volume required (100%) in each bottle e.g. shredded paper or small pieces of corrugated cardboard.
Each composting container should be labelled with its contents, the start date and the students name
A tablespoon of compost may be added to each bag/bottle to introduce composting microorganisms together with a tablespoon of water to provide moisture.
In addition to providing a means to insert thermometers without compressing the contents the straw provides to air centre of the compost in the bottle.
The bottles should be kept in a well-ventilated area during the experiment but not in direct sunlight. It is best that they are kept in a warm room as the ambient temperature will affect the rate of decomposition.
The temperature of the organic material should be recorded daily for the next two weeks inserting the thermometer down the straw to the same position in the composting material each day. The experiment should be continued until there has been no temperature change for two days.
Photographs should be taken every two or three days or when ever the is an obvious change in any of the bottles.
-
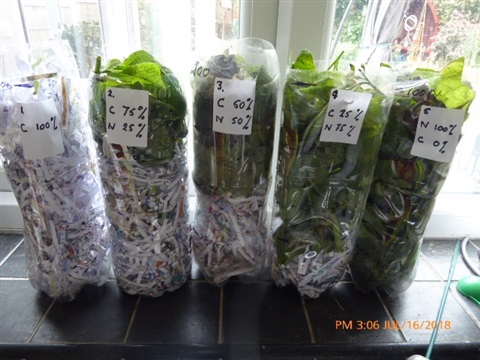
C:N Rotbots
Contents are
100% "greens" (comfrey) ,
75% greens:25% Browns,
50:50,
25% Greens 75% Browns and 100% Browns -
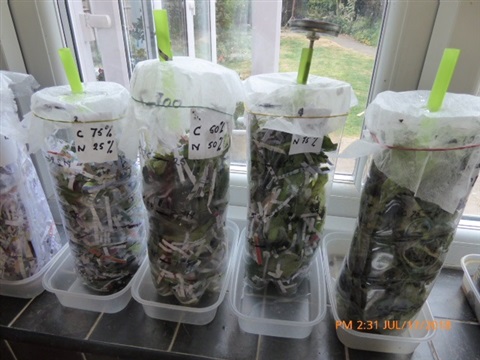
Rotbots on day 1 showing straws and thermometer
-
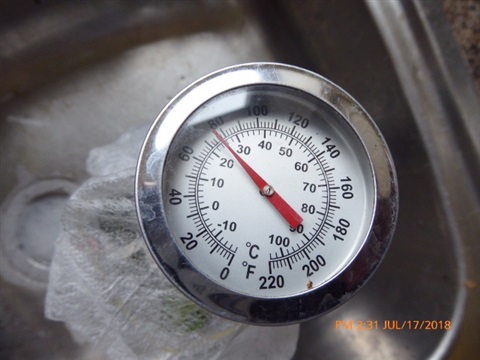
Temperature recording day 1
-

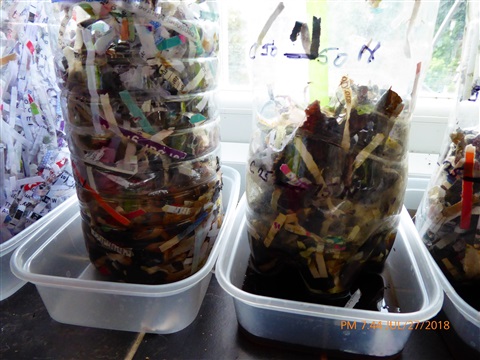
Rotbots from left to right
100% Browns,(Shredded paper
25% Greens,
50% Greens,
75% g
Greens and
100% Greens (Comfrey) -
Left ; 25% Greens,75% Browns
Right 50:50 -
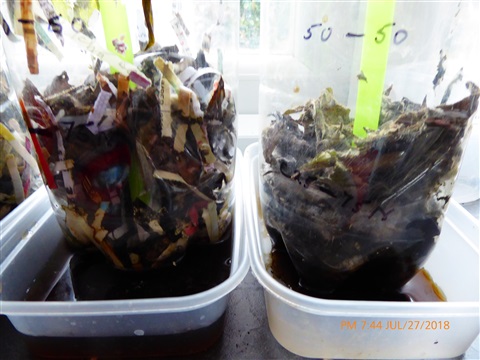
Left 75%greens, 25% Browns
Right 100% Greens
Rotbot and C:N ratio
Results
The photos above show the decomposition of the different C:N ratios.
Temperatures were taken but in the loosely packed Rotbots there was little difference between the readings using the compost thermometer.
This experiment is on-going. In the example above the material was packed loosely in.the bottles to allow maximum aeration despite the fact that this allowed the material to dry out more easily despite regular watering. The next stage will involve packing the material into the Rotbots more tightly to increase the moisture content.
You are invited to send your photos and results to carryoncomposting1@gmail.com
Latest comments
Do you have any data on ' application ' of Aerated Vermi Compost Tea to Mangoes and benneficial outcomes .
Very informative site. Having been away for 5 weeks and returning to evidence of rats under and around the compost bin, I can testify to lack of human activity allowing the rats to get comfortable.
can i use dog manure in compost and mulching leaves?
What is the C and N ratio for coffee chaff?